How to Photograph Paintings and Prints with Copy Lighting
on
Get link
Facebook
X
Pinterest
Email
Other Apps
Photographing prints and paintings can be intimidating. You want to
accurately record the colors and texture of the piece so that your work
is represented at its best, but the the scale, delicateness, and
intricacy of the pieces often makes this tricky. In this tutorial,
you'll learn two ways to photograph paintings or prints using a tripod
and a pair of lights to ensure the lighting is even and the colors
accurate. Have no fear: with a little bit of methodology and some good
light photographing paintings can be easy, and even fun!
Things you will need
Tape measure
Tripod
Lights
Camera
Gray card
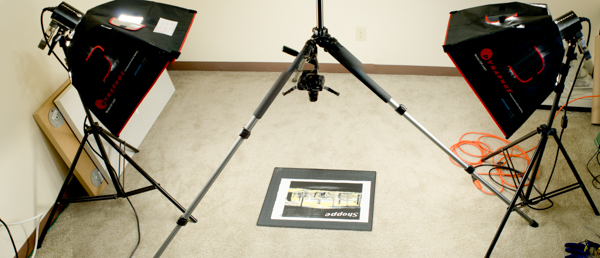
Photographing Unmounted Artwork
If
the work is not mounted or framed, such as loose print, it will be more
practical to photograph it lying flat on the floor rather than trying
to prop it upright. However, if your piece is too large and you can’t
get your camera high enough above the work to fit it entirely into a
frame without getting tripod legs in the way, the setup used for the
mounted work (described below) will work better.
Set Up a Tripod
Set
up a tripod around the piece on the floor. You may want to put the work
on a piece of white foamcore or a self-healing cutting mat. The
advantage of the mat is that it has grid lines, which you can use to
ensure your paper is straight. Once your tripod is over the work area,
adjust your tripod so it can face the floor.
Some tripods allow
you to take the center column out and mount it upside down and splay the
legs out farther than their normal position. This configuration places
the camera directly above your work area and allows you to photograph
larger pieces without the tripod legs getting in the way.
Prepare and Position the Artwork
Prepare the artwork by making sure it is free of dust and checking to see if it lies flat.
I
set up a self-healing cutting mat that has a grid printed on it to help
me line up the edges of my subject. This is not entirely necessary but
having some tape marks at the very least will help you line up each
piece if you are photographing a number of items.
Place the artwork on the surface and line it up so that you can squarely position it in the camera’s frame.
Set Up Camera to Squarely Frame Artwork
Position
the camera on the tripod and line it up so that it is as squarely
situated as you can get it. Ideally the back of the camera will be
parallel with the ground. A small level laid on the back of the camera
will help. Aligning the camera squarely will help eliminate unwanted
lens distortion, which will save lots of post-production time and make
the end result look much better.
We want to fill as much of
the frame of the camera with the subject as possible. However, most
artwork does not conform to the standard aspect ratio of a camera. If
that is the case for your work, fill the frame and leave only minimal
areas to crop out later.
Position a Pair of Lights to Evenly Illuminate the Surface
Even
lighting is key to making a well-exposed image that needs little
post-production work. For this set up, we will use a pair of lights
positioned at equal distances from the subject. This kind of lighting is
called "copy lighting," because we are lighting to make as exact a copy
of the subject as possible.
First we will go head and measure out equal distances with a tape measure: The
lights should be positioned down at 45 degree angles toward the
subject. Once I have them at that angle and equal distances, I will
start to check the surface for even illumination. I have an incident
light meter to help me take exposure readings. It records how much light
is falling on the subject, unlike the meter in a camera which records the light reflected from the subject. If
you don’t have an incident light meter at your disposal, you can use a
gray card and record exposure readings using your camera. Just change
the metering mode of your camera to the spot meter and record the
exposure value as you place the gray card in different areas of the work
area. Check the four corners and center. If the reading are equal, the
light is perfectly even.
For more information on this method, check out this informative tutorial about using a gray card to set exposure and colour balance.
Set Exposure, Focus, and White Balance on the Camera
It
is very important for when photographing artwork to have your color
balance set accurately. To set custom white balance, select that option
in your camera’s menu and use a gray card to adjust the white balance.
To
set exposure for the camera I will use the manual mode (M) and my light
meter reading. If you don’t have a light meter use a gray card and your
camera’s meter to get a reading. Carefully
adjust the focus using manual focus and check with LCD screen on your
camera until you can see that the smallest detail is in focus. Then take
a test photo and zoom in to make certain that everything is in focus.
Take Your Photo
You
are almost ready to take your photo! If you have a cable release, using
it will reduce vibration and create a sharper image. If you don't have a
cable release, switch your camera to it's timer mode. This mode is
called various things on different cameras, sometimes marked as a little
stopwatch. It delays the shutter release, letting the camera come to
rest and the vibration caused by your finger pressing the shutter
button.
Ok, now go ahead and press the shutter release.
If
the image looks good on review, great work. If not, check over the
setting and repeat the previous steps. Once everything is dialed in, you
can photograph pieces of artwork all day long on the same settings. After you have taken the photos it is time to edit. Find a walk-through after the setup for mounted work.
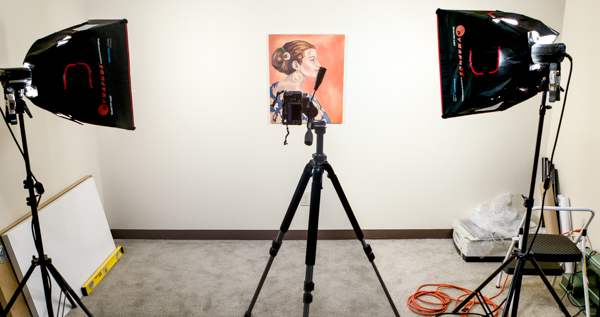
Photographing Mounted Artwork
If
the work is mounted or framed, such as a stretched canvas or framed
print it may be more practical to photograph it hung on the wall,
especially if it is a very large piece.
Prepare and Position the Artwork
Prepare
the artwork by hanging it on a wall. Hang the piece at a comfortable
working height and make sure it is level because that will help you line
everything up squarely.
Set Up a Tripod
Set
up a tripod so that it faces toward the painting and adjust the tripod
head to be level using a level. Many tripods have built-in spirit levels
to help. Again, this will help us line everything up squarely.
Set Up Camera to Squarely Frame the Artwork
Position
the camera on the tripod and line it up so that it is as squarely
situated as possible to the artwork. Ideally the back of the camera will
be parallel with plane of the artwork, though this is sometimes
trickier to do with large wall-mounted pieces. If you have the option,
moving your camera back and using a longer lens can make positioning
your camera easier: the further away from the artwork you are, the
shallower an adjustment you have to make to get your camera
perpendicular to the artwork. Don't back up too far, thought, you want
to keep the piece as large as you can in the frame.
Position a pair of lights to evenly illuminate the surface
Even
lighting is key to making a well-exposed image that needs little
post-production work. For this set up, we will use a pair of lights
positioned at equal distances from the subject. So first I will go head
and measure out equal distances with a tape measure. A rule of thumb is
that the larger the piece you are photographing, the further away the
lights need to be positioned. Again
the lights should be positioned at 45 degree angles toward the subject.
Once you have them at that angle and equal distances, check the surface
for even illumination. If
you don’t have an incident light meter at your disposal, you can again
use a gray card and record exposure readings using your camera. Just
change the metering mode of your camera to the spot meter and record the
exposure value as you place the gray card in different areas of the
work area. Check the four corners and center. If the reading are equal,
the light is perfectly even.
Set Exposure, Focus, and White Balance on the Camera
It
is important to have your color balance set accurately. Again use the
camera’s custom white balance. To set custom white balance, select that
option in my camera’s menu and use a gray card to adjust the white
balance. Watch
out for uneven color casts. If one of the walls in the area you are
photographing is a strong color, and it catches some of the light from
your setup, that colour may "bleed" into your artwork. If you do have
this problem, a neutral-colored blanket or a piece card stock can help
to block to offending light.
To set exposure for the camera,
again use the manual mode (M) and light meter reading. If you don’t have
a light meter, use a gray card and your camera’s meter to get a
reading. Carefully
adjust the focus using manual focus and checking with LCD screen on
your camera until you can see that the smallest detail is in focus.
Take a test photo and zoom in to make certain that everything is in
focus.
Advertisement
Take the Photograph!
You
are ready to take your photo. So go ahead and press the shutter
release. If the image looks good on review, great job. If not, check
over the setting and repeat the previous steps. Once everything is
dialed in, you can photograph pieces of artwork all day long.
Image Processing: Crop, Levels, and Sharpness
Once
you have the photo on your computer, we can perform a few edits to
enhance the quality of the image. I will demonstrate the most essential
edits in Adobe Photoshop.
While we were working with the camera,
we tried to get as close to the edges of the print as possible.
However, since the aspect ratio was different, we need to cut out
anything that is not the image area on the print. So the first step is
to crop the image. For this task, I want to use the Perspective Crop tool which is found in the flyout menu under the normal Crop tool. Using the Perspective Crop
tool, I will move the corners of the crop rectangle to the corners of
the artwork. I like to zoom in and make certain that the corners are as
closely lined up as I can get them while keeping out unwanted areas.
Then, press OK to crop. The software will cut out the area you told it to and re-calculate the image to be a rectangle. The first adjustment we will make is to the Levels. To find the Adjustments panel and click on the Levels
button. This will adjust the tones in the image to look more like the
original item. The levels adjustment shows a histogram that has three
sliders under it. We
will begin by adjusting the slider for the light areas of the image. It
is found on the right side. Take that slider and slide it to the left
until it meets the histogram graph. This will brighten the light areas
of the image. You want match the brightness of the original artwork.
Next,
take the slider found on the left side and slide it to the right until
it meets the histogram graph. This will darken the darker areas of the
image try match the dark tone to the original artwork.
The third
slider lies under the center of the histogram and adjusts the overall
brightness of the image. If your image looks too light or dark, try
adjusting the center slider slightly left or right. You want match the
overall appearance of the original artwork.
The second adjustment we will make is to sharpen the image using the Smart Sharpen filter. Zoom in to 100% on the image. Then, go up the Filter menu in Photoshop and find the Sharpen option. Select the Smart Sharpen option in the sub-menu. I
will set the overall amount to somewhere around 120%, or to where I see
the brush strokes or other surface detail becoming clearer. I will keep
the radius at 1 pixel to keep the adjustment minimal and not over
enhance the texture. The goal with with this adjustment is to enhance
some of the detail such as the brush strokes in this painting.
And that's it! Here's a look a the final images: